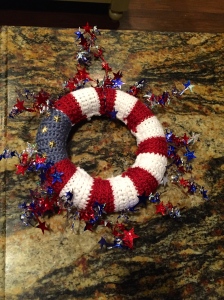
Fourth of July Wreath

IMG_5046

I’ve been meaning to use up scrap yarn (goodness knows I have a ton of it) and the small styrofoam wreath that I’ve had in my possession for over a year now, so I decided that there’s no time like the present! I found red, white, and blue yarn, grabbed my wreath and crochet hook, and went at it!

Here’s what you’ll need:

Foam wreath (I’ve used one that is 8 inches in diameter for this project)

red, white, and blue yarn

crochet hook to match gauge of yarn (I used a 5 mm, but it may vary depending on what yarn you choose)

13 star brads (I used gold, but other colors would also work)

Red, white, and blue star wire garland

Directions:

1. With blue, ch 21.

2. Skip first ch. Sc in next 20 ch. Turn.

3. Ch 1. Sc in each sc across. Turn. Repeat this row until block of blue is as large as desired for blue square of flag. (15 rows for the 8 in diameter wreath.)

4. Join red to piece. Sc in each sc across. Turn. Ch 1. Repeat row five more times for a total of six rows.

5. Join white yarn to piece. Repeat step four.

6. When white stripe is completed, switch back to red. For a small wreath like I have created, you can get thirteen stripes on the piece at 6 sc rows for each stripe. When stripes are done, finish off, leaving a long end for sewing together and to piece.

7. Sew ends of piece together, forming a circle. Then, slide onto wreath and sew edges together around wreath.

IMG_5032

8. Take 13 star brads, and stick them into blue area of flag as desired. The foam keeps them secure, so no need to use any glue or ties!

IMG_5034

9. Cut star wire garland in as many pieces and as long as desired. Wrap garland pieces around a pen or pencil to coil. Slide off pen or pencil, and lengthen coil to length desired. Stick one end of cut garland into the side of the foam wreath. Once again, you shouldn’t have to use glue or any other securing device: the foam wreath holds the wire in place! Using same garland, wrap around center of piece to create hook to hold the wreath up.

And here’s the finished product!
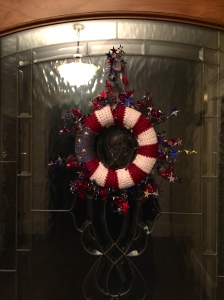
IMG_5048

Easter Egg Wreath

IMG_4917

Happy Easter, everyone!

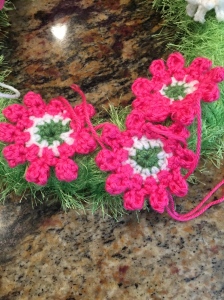
It’s been awhile since I made a wreath, and I had a fun idea for a wreath: a grass covered wreath with flowers. I wrapped green fun fur yarn around a 12 inch wreath, and then I took a flower pattern book out of my crochet book stash and chose a couple flowers I liked to crochet.

IMG_4882

IMG_4910

IMG_4911

IMG_4912

After placing the flowers on the wreath, I realized that it needed something more, and I decided to make it an Easter wreath. I chose to make four Easter eggs to go in between the flowers, and then decided I needed a rabbit in the center. Both of those patterns can be found on lionbrand.com. My mother created the big, pink bow for me. My mom also helped me with the embroidery parts on the rabbit because I was frustrated. I had changed the pattern of the egg cozy rabbit and made it a stuffed animal, but I didn’t think to do the embroidery before I stuffed and closed up the body. Note, if you’re making this rabbit, you’ll want to embroider the nose and mouth before stuffing the body. We compromised with a heart button for the nose, and the mouth was a bugger.

IMG_4909

IMG_4913

The next step was to put it all together. Rather than try to tie everything on and still have the green look like grass, I decided to hot glue all the crocheted pieces on the wreath. The only piece I’m somewhat worried about staying on in storage is the rabbit, but the benefit of hot glue is that I can re-glue it if I need to next season, right?

Overall, I was very pleased with the final product:

IMG_4917

Happy Easter season everyone!

Set Sail Wreath

IMG_2644


Need something fun and summery to hang on your door? Look no further. This wreath is designed with water and boat enthusiasts in mind, but is great for any home that’s in love with summer.


Supplies Needed
12 inch round wreath
Two different color blue yarns (it takes between 1/3 and 1/2 of the skein to create)
Yellow yarn
White yarn (scrap yarn usable)
Grey yarn (scrap yarn usable)
Hook to match gauge for yarn
Polyfill for sun
Small toy sailboat
Ribbon
Darning needle

Main Wreath
Ch 132.
Sc in 2nd chain from hook. Sc in next four ch. *three sc in next ch. sc in next five ch. skip next 2 ch. sc in next five sc.* repeat from * to * to end of ch. ch 1. Turn.
Scdec in next 2 sc. sc in next 4 sc. *three sc in next sc. sc in next 5 sc. skip next 2 sc. sc in next 5 sc* repeat from * to * across to last two sc. scdec in last 2 sc. ch 1. Turn. Switch colors.
Repeat row 2, switching colors every two rows. End after 20 rows complete.

Sun

Ch 2
6 sc in second ch from hook. Do not turn.
*2 sc in next sc* around. 12 sts
*sc in next sc. 2 sc in next sc.* 18 sts
*sc in next two sc. 2 sc in next sc.* 24 sts
*sc in next three sc. 2 sc in next sc.* 30 sts
*sc in next four sc. 2 sc in next sc.* 36 sts
*sc in next five sc. 2 sc in next sc.* 42 sts
*sc in next 6 sc. 2 sc in next sc.* 48 sts
Slip st in next sc. sc in next five sts. Turn.
Scdec. Sc in next sc. scdec. Turn
Scdec. Turn.
Sc. ch 1. Turn.
Sl st down side of triangle.
Repeat around to last sc. sc in last sc. finish off.
For second side of sun, follow pattern until 48 sts line.

Assembling Sun

With yellow yarn and darning needle, sew back circle to the wrong side of the front side of the sun. Leave a small hole to fill with polyfill.
Fill sun with polyfill until sun is size desired.
Close off hole.

Clouds

Ch 12. 4 dc in third ch from hook (2 ch count as 1 dc.) *Sl st in next ch. 5 dc in next ch.* to end. Ch 1. Do not turn.
Working back side of row just finished, sl st in ch of last shell. *5 dc in next ch. sl st in ch of shell.* to last sl st. Ch 1. Do not turn.
5 sc around dc of shell. Sk next dc. *Shell in sl st. Skip next dc. Sc in next three dc.* repeat from * to * around. Fasten off.
Connect grey to any stitch. Sc around. Fasten off.
Ch 8. Sc in third ch from hook. (2 ch count as 1 dc.) *Sl st in next ch. 5 dc in next ch.* to end. Ch 1. Do not turn.
Working back side of row just finished, sl st in ch of last shell. *5 dc in next ch. sl st in ch of shell.* to last sl st. Ch 1. Turn.
Sc in next four dc. Sk next dc. Shell. Sk next dc. Sc in next four dc. Fasten off.
Connect grey to any stitch. Sc around. Fasten off.
Layer smaller cloud on top of larger cloud and sew together.

Connecting Pieces to Wreath
Sew blue piece around 12 inch wreath.
Place clouds on the right Center of the top of the wreath and sew on.
Place sun to left Center of the top of the wreath and sew in place.
Choose ribbon to hang wreath and wrap around top Center of wreath, knotting once at base, leaving enough space wanted for hanging, and a bow at top of ribbon.
Hot glue sailboat to center of wreath.

Gold Pipe Rainbow Wreath

IMG_2105

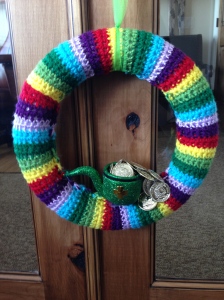
I have so much scrap yarn, and the pile just keeps growing as I get more projects and need “just a little more yarn than this skein supplies.” So I went looking online for ideas and found a picture of a rainbow wreath with a pot of gold in the middle. I went searching for a good pot of gold because I didn’t want to try and make one myself, and all I could come up with was a glittery green pipe with a gold four leaf clover on it and some pirate coins. So, I bought those things and decided I’d go with it. The pattern I created to try and match what I saw went something like this:

Choose rainbow colors in various shades: purple, blue, green, orange, red, yellow, etc. You’ll also need a 12 inch wreath (I just got a foam one from the floral section of the craft store), a needle to sew in loose ends, and a size 4.5 crochet hook (or whatever will make your project wide enough to cover the wreath).

Chain 21 in first color.

Turn the work, and sc in second chain from hook and across (20 sts).

Ch 1. Turn work. Sc across.

Drop first color. Turn work. Add second color by sc in first sc and then across. Ch 1. Turn.

Sc across.

Drop second color. Turn work. Add third color by sc in first sc and then across. Ch 1. Turn.

Sc across.

Repeat this process with other colors. Work your rainbow as long as you need it to cover a 12 inch wreath.

Sew the rainbow piece around the foam (or whatever material yours is made of) wreath.

The finished sewed wreath will look something like this:

IMG_2102

Decide what you’re going to use to hang your wreath (I used green tulle).

Hot glue the pipe (or pot or whatever you’re using) to the middle of the bottom inside of the wreath. I used some yarn as well to help secure the end of the pipe to the wreath.

Hot glue in your coins however you like.

And here’s the finished product!

IMG_2106