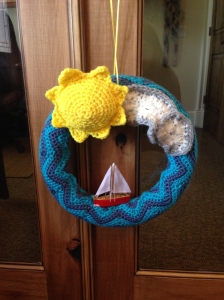
Need something fun and summery to hang on your door? Look no further. This wreath is designed with water and boat enthusiasts in mind, but is great for any home that’s in love with summer.
Supplies Needed
12 inch round wreath
Two different color blue yarns (it takes between 1/3 and 1/2 of the skein to create)
Yellow yarn
White yarn (scrap yarn usable)
Grey yarn (scrap yarn usable)
Hook to match gauge for yarn
Polyfill for sun
Small toy sailboat
Ribbon
Darning needle
Main Wreath
Ch 132.
Sc in 2nd chain from hook. Sc in next four ch. *three sc in next ch. sc in next five ch. skip next 2 ch. sc in next five sc.* repeat from * to * to end of ch. ch 1. Turn.
Scdec in next 2 sc. sc in next 4 sc. *three sc in next sc. sc in next 5 sc. skip next 2 sc. sc in next 5 sc* repeat from * to * across to last two sc. scdec in last 2 sc. ch 1. Turn. Switch colors.
Repeat row 2, switching colors every two rows. End after 20 rows complete.
Sun
Ch 2
6 sc in second ch from hook. Do not turn.
*2 sc in next sc* around. 12 sts
*sc in next sc. 2 sc in next sc.* 18 sts
*sc in next two sc. 2 sc in next sc.* 24 sts
*sc in next three sc. 2 sc in next sc.* 30 sts
*sc in next four sc. 2 sc in next sc.* 36 sts
*sc in next five sc. 2 sc in next sc.* 42 sts
*sc in next 6 sc. 2 sc in next sc.* 48 sts
Slip st in next sc. sc in next five sts. Turn.
Scdec. Sc in next sc. scdec. Turn
Scdec. Turn.
Sc. ch 1. Turn.
Sl st down side of triangle.
Repeat around to last sc. sc in last sc. finish off.
For second side of sun, follow pattern until 48 sts line.
Assembling Sun
With yellow yarn and darning needle, sew back circle to the wrong side of the front side of the sun. Leave a small hole to fill with polyfill.
Fill sun with polyfill until sun is size desired.
Ch 12. 4 dc in third ch from hook (2 ch count as 1 dc.) *Sl st in next ch. 5 dc in next ch.* to end. Ch 1. Do not turn.
Working back side of row just finished, sl st in ch of last shell. *5 dc in next ch. sl st in ch of shell.* to last sl st. Ch 1. Do not turn.
5 sc around dc of shell. Sk next dc. *Shell in sl st. Skip next dc. Sc in next three dc.* repeat from * to * around. Fasten off.
Connect grey to any stitch. Sc around. Fasten off.
Ch 8. Sc in third ch from hook. (2 ch count as 1 dc.) *Sl st in next ch. 5 dc in next ch.* to end. Ch 1. Do not turn.
Working back side of row just finished, sl st in ch of last shell. *5 dc in next ch. sl st in ch of shell.* to last sl st. Ch 1. Turn.
Sc in next four dc. Sk next dc. Shell. Sk next dc. Sc in next four dc. Fasten off.
Connect grey to any stitch. Sc around. Fasten off.
Layer smaller cloud on top of larger cloud and sew together.
Connecting Pieces to Wreath
Sew blue piece around 12 inch wreath.
Place clouds on the right Center of the top of the wreath and sew on.
Place sun to left Center of the top of the wreath and sew in place.
Choose ribbon to hang wreath and wrap around top Center of wreath, knotting once at base, leaving enough space wanted for hanging, and a bow at top of ribbon.
Hot glue sailboat to center of wreath.


